
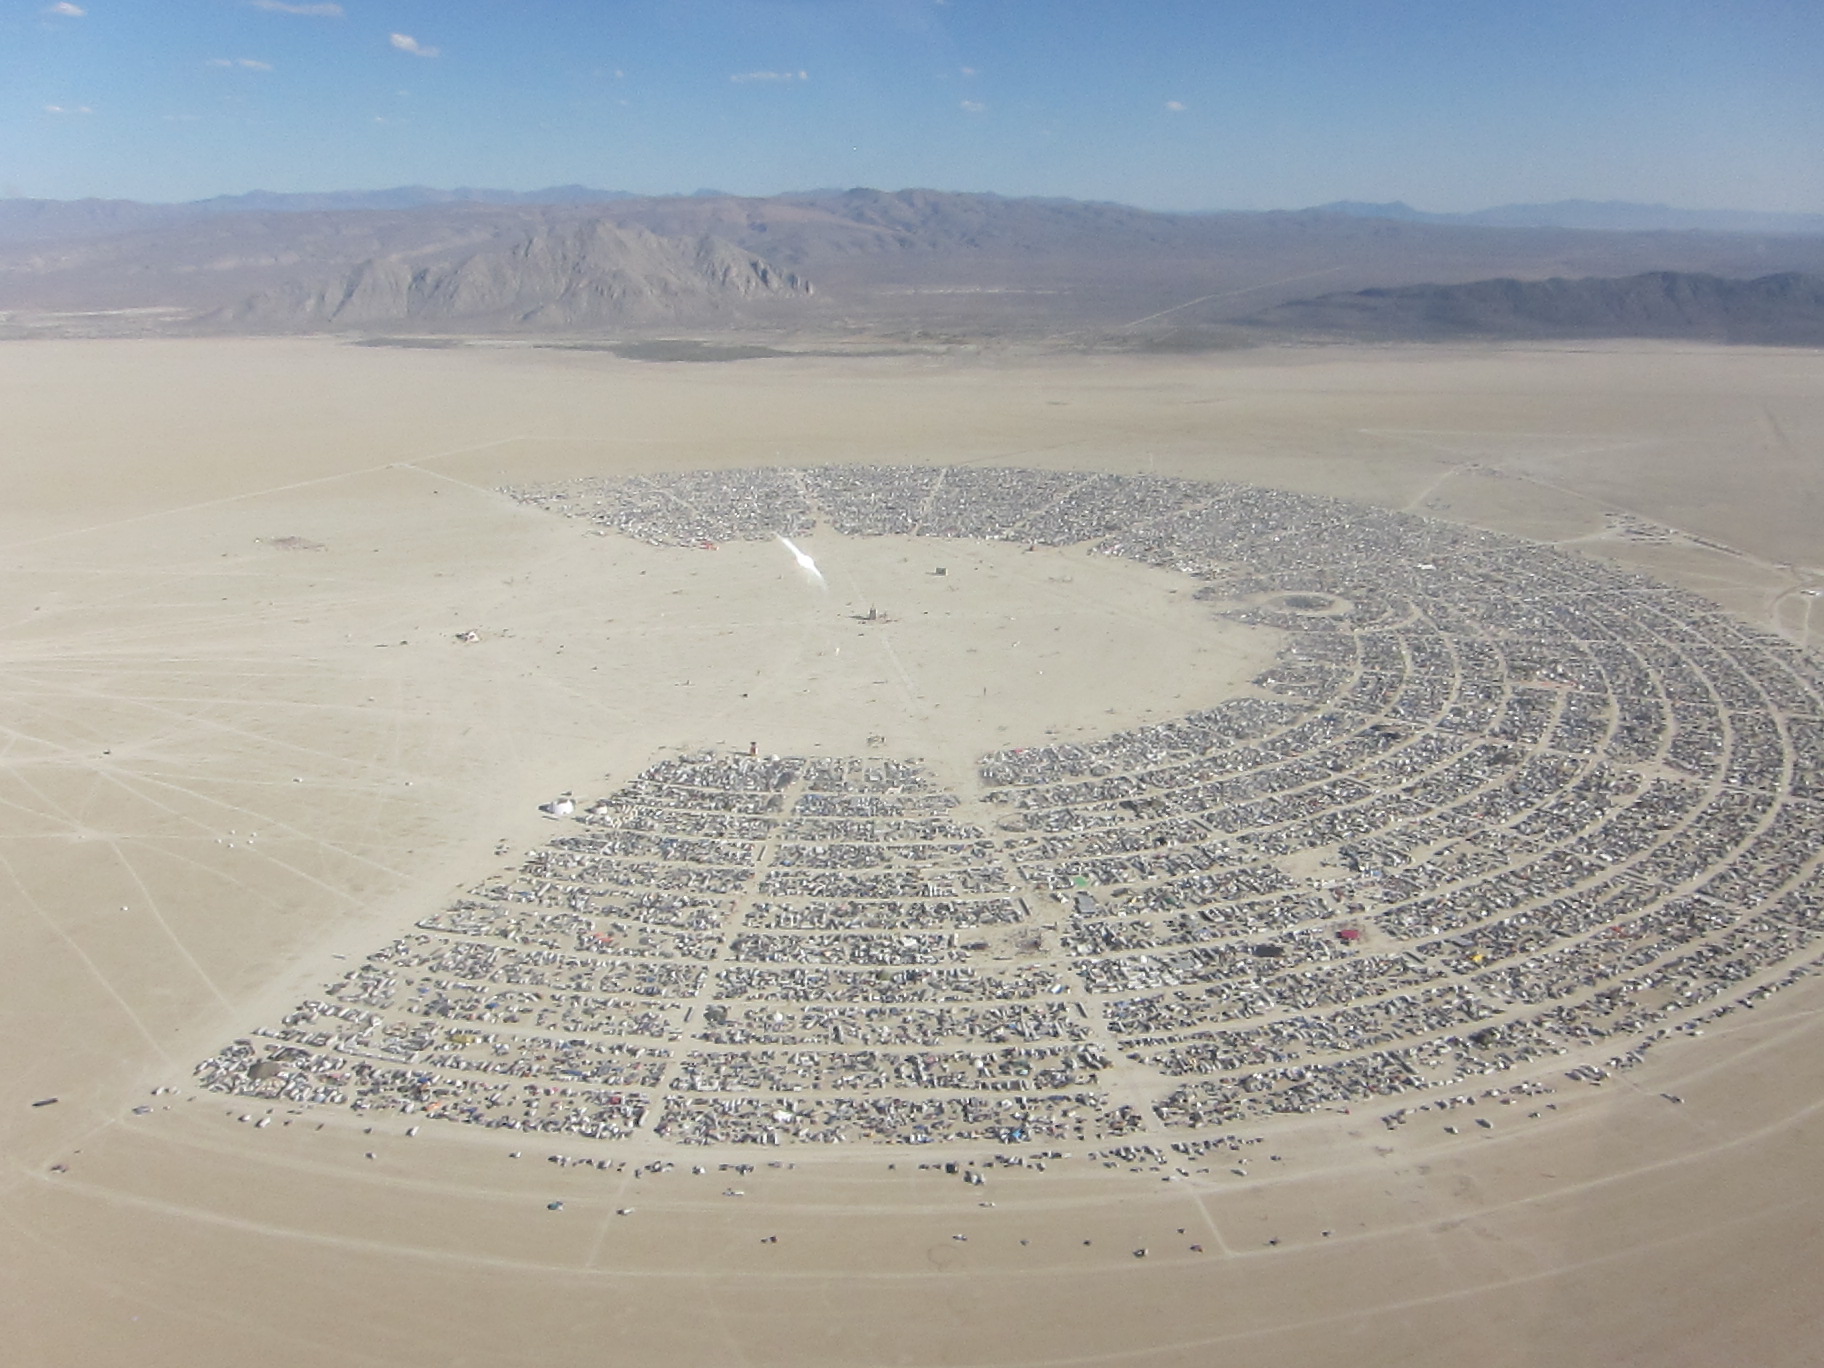
Burning Man is a crazy desert art festival and party in northern Nevada. It takes place on federal public lands and attracts about 60,000 people each year. Everything there is radically off-grid. You bring your own power, water and food and take everything with you again when you leave. Here’s an aerial view of the city in the desert (dubbed Black Rock City) that springs up overnight for the festival:
But this means visitors generally bring diesel generators for power, or use built-in RV generators for camp power. And did I mention the driving and flying to get there? People think nothing of driving ten or fifteen hours to get there, or flying in from the East Coast or Europe.
Efforts are abundant to green up Burning Man, and now that solar components are getting cheaper on Amazon, we’re increasingly see DIY systems crop up.
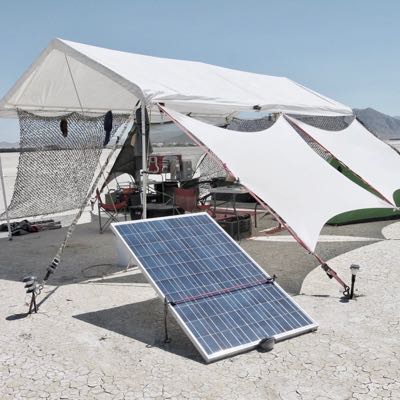
Here’s Sean’s system for Burning Man 2017 in Nevada. He used it to run phones, fans, swamp coolers and lights.
The Kit
Parts Cost on Amazon: $217.09
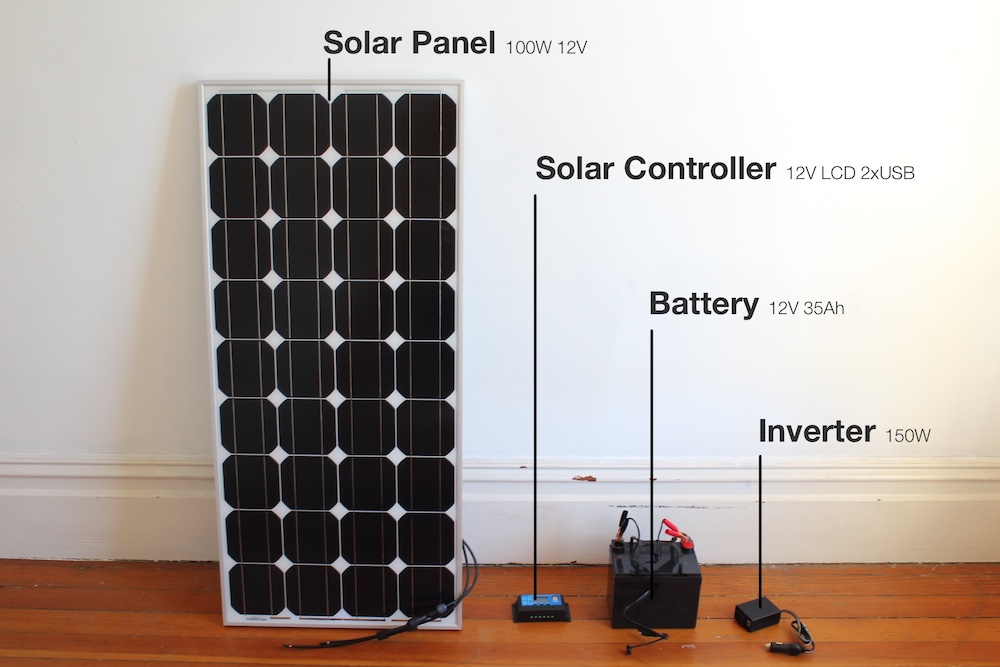
Solar Panel

Cable

Solar Controller

Cable 2

Lead-Acid Deep Cycle Battery

Inverter


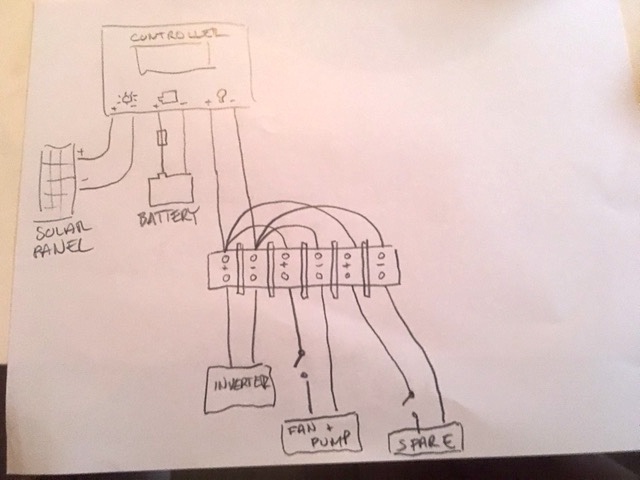
The goal is to take care of my festival energy needs for during Burning Man 2017. 4 main components are all we need to achieve this: A solar panel to collect, a battery to store, an inverter to convert the direct current to alternating current, and a “charge controller” to balance the three other components.
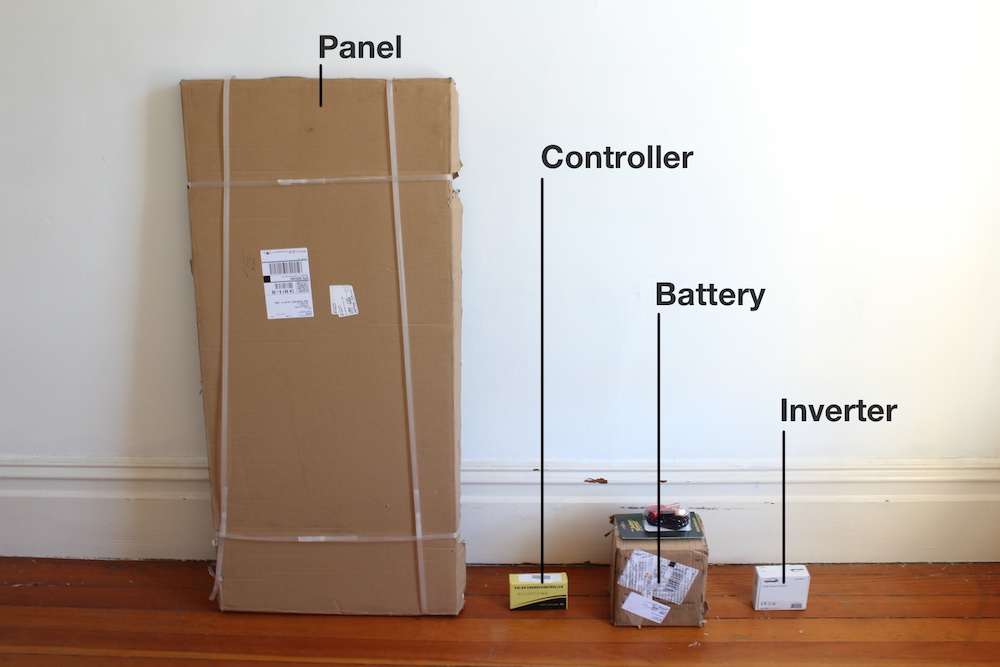
I’m using bargain-basement parts intended for RV, marine & car usage which keeps my system cheap and mobile. The main components as found on Amazon are above.
 |
 |
|---|---|
I ordered the system on July 2nd, and with ground shipping the PV panel arrived July 11th from Canada, and the battery, wiring, controller and inverter arrived July 15th from Amazon USA.
 |
 |
|---|---|
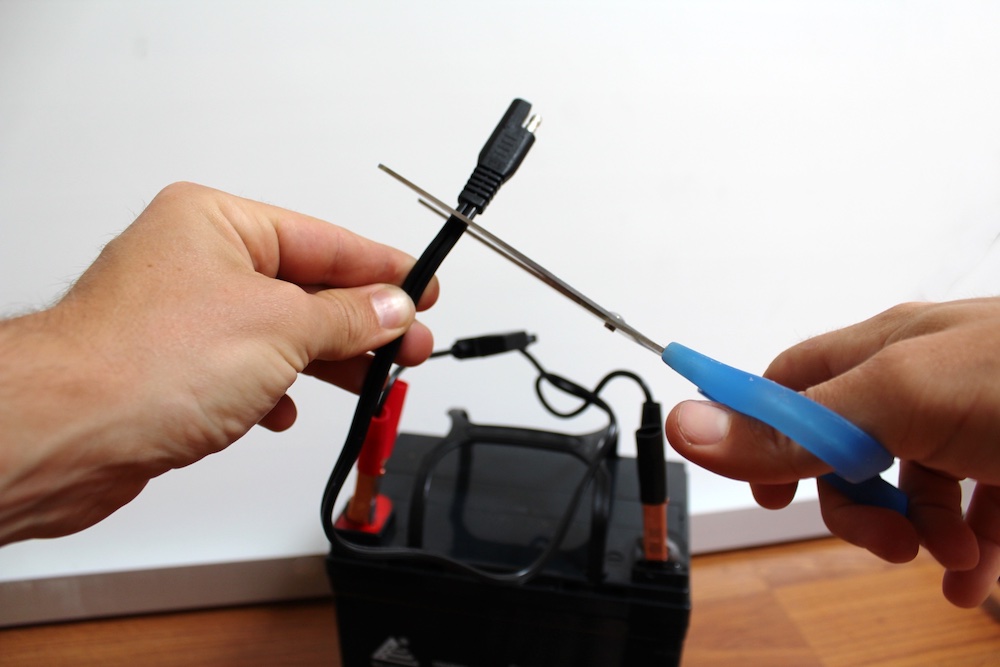
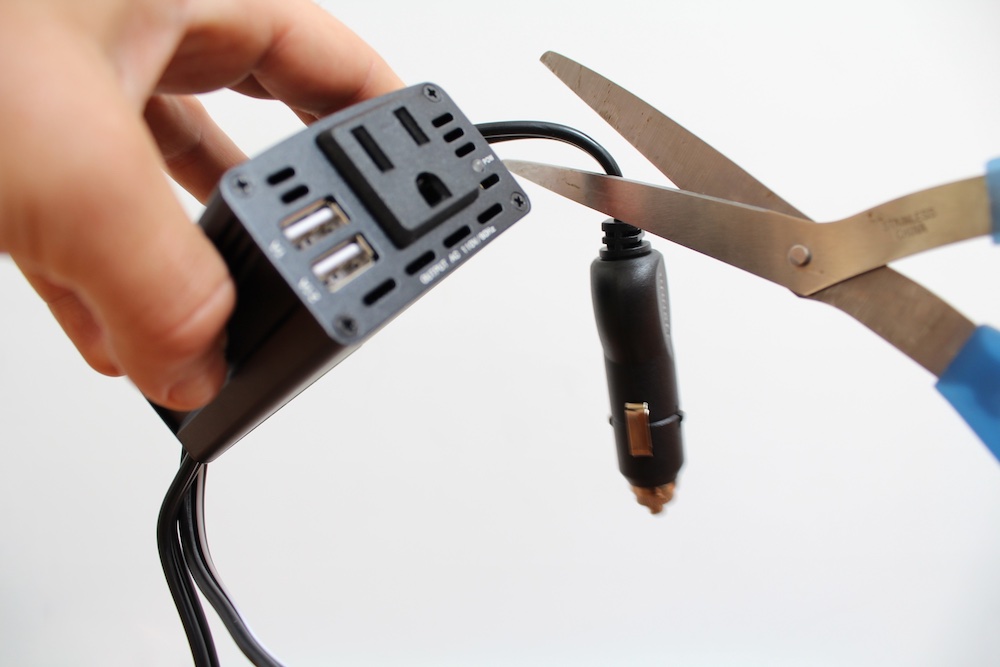
Step 1 Cut and lay bare the end of the battery & inverter wires (battery disconnected, please). The panel’s wires are already bare on one end. Do a dry run connecting battery, inverter and panel to the controller — it should look like above.

Step 2 Detach the panel wires again and place the panel on the car, tent or wherever you get the most sunlight. Attach the panel to something: I zip-tied the back of the panel to a car with multiple zipties. You don’t want this coming undone in a dust storm! The panel is mounted on top of the car at a fixed angle, and run the power lines back to your main battery next to the tent.
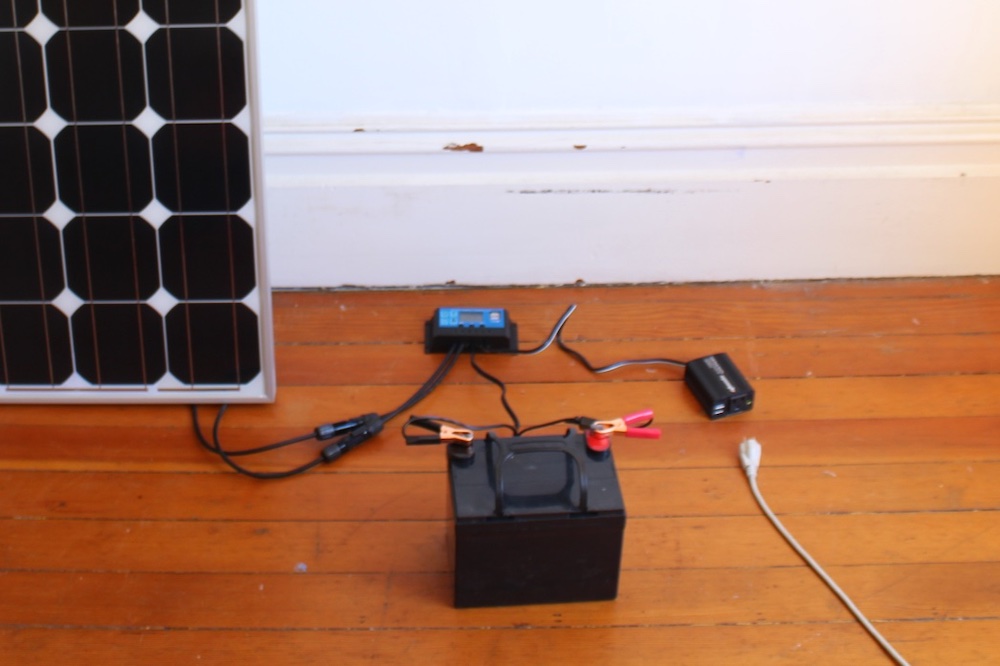
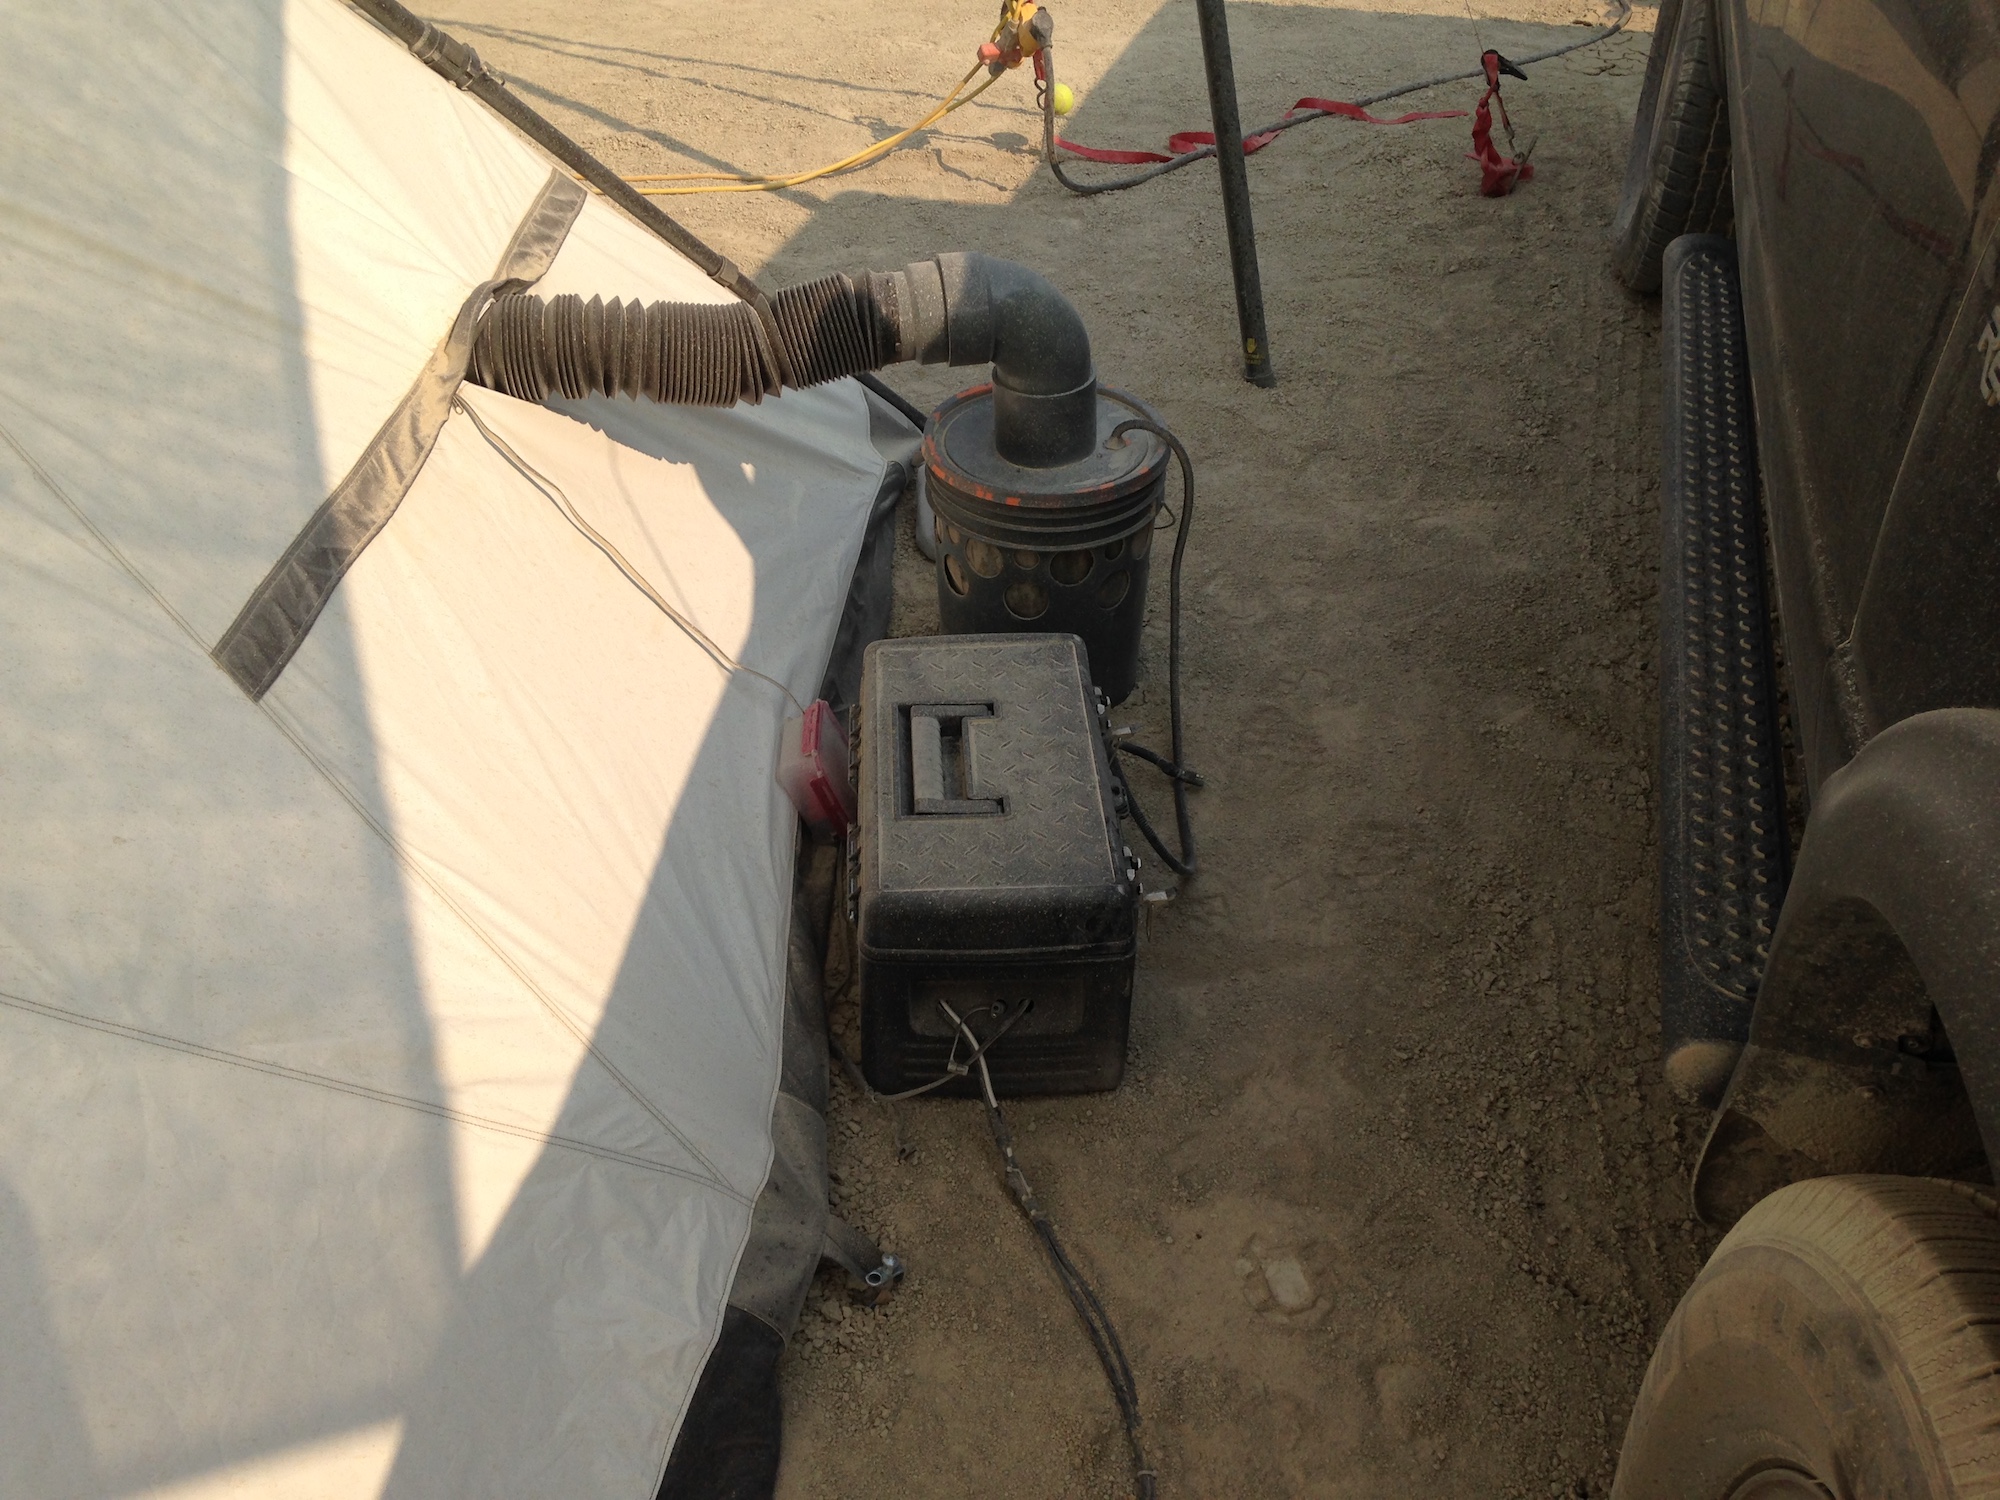
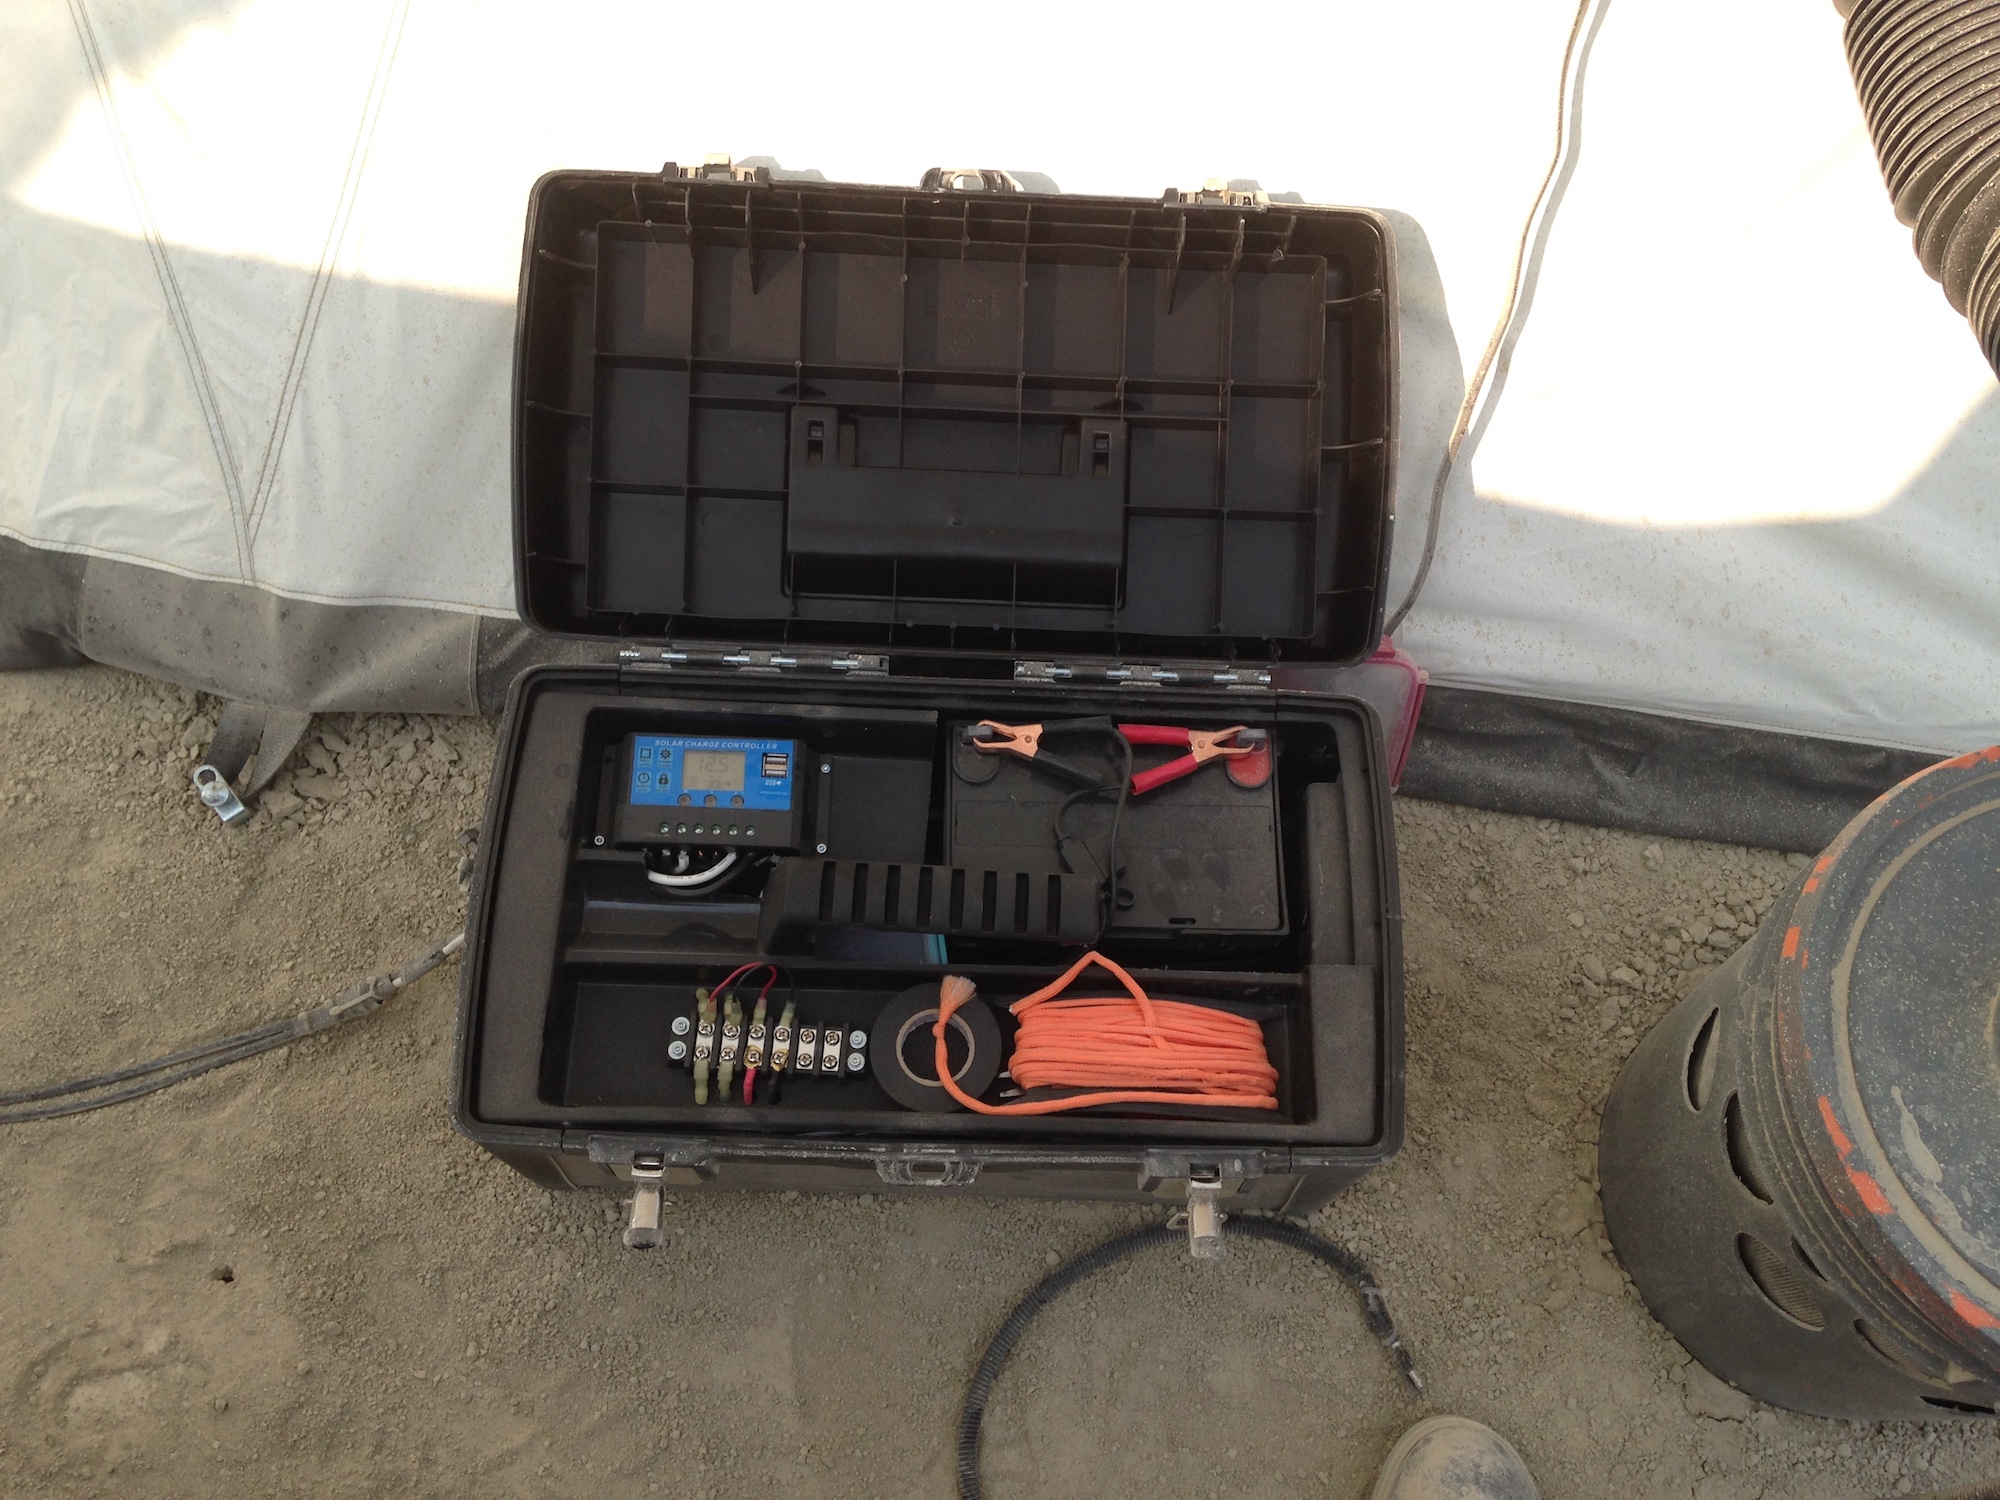 Step 3 Assemble the solar controller, inverter and battery into a tighter package. Re-clamp the wire from the panel to the solar controller and place it in the box. It should look as above. The charge begins! Next to the tent, the toolbox contains the battery, inverter and controller. Next to it is a swamp cooler and a cable leading into his tent (AC extension cable from the inverter in the box) powering another fan, chargers and lights.
 In the evening, turn on the inverter. My lamp, computer, tablet & phone are all being powered simultaneously here on the day’s solar charge! Self sufficiency achieved?
Sean’s running a great modified system – DC power goes to the swamp cooler’s fan, the battery is laid into the tool tray. Plenty of extra space in this toolbox, which protects the system from dust and the sun.
Sean listed the main three reasons he decided to build his own system vs. bringing a diesel generator:
* No Fuel Required
* No Noise
* Compact
“A green (his words) device with enough wattage to power a DC swamp cooler”. He usually got 6 hours into the night before the battery was drained, but at that moment the sun came up and started generating energy again to power the swamp cooler.
We’re going to add a box to the recommended kit, to give it a more rugged and finished look for outdoors and festival use.
Tech Specs
Polychristalline Solar Panel
Size: 39.8 x 1.2 x 26.6 inches
Weight: 19.6 pounds
Voltage: 12V DC
Max power rating: 100W
Max amperage: 8.3A


Inverter
Max power rating: 150W<br> (turns off if you use more than this, but a 300W version is $6 more)
Voltage: 12V DC in, 110V AC out
Only DC 12V, NOT for DC 24V
USB Output: 5V/1+2.1A (5W and 10.5W respectively)

Solar controller
Voltage: 12V/24V
Ports: 2x USB, 1x DC in, 1x DC out
Charge Current: 20A
Discharge Current: 20A
Max in: 20A * 12V = 240W
Max out: 20A * 12V = 240W
USB Output: 5V/3A (15W) each
Type: PWM
Weight: 0.25 pounds
Size: 5.9 x 3 x 1.4in
Will upgrade to a USB-C version when available

Marine lead-acid battery (Deep Cycle)
Voltage: 12V DC
Storage Capacity: 0.42Kwh, 35Ah
Size: 6.5 x 7.7 x 5.1 in
Weight: 25 pounds


Cables (aka "Tender" or "B.O.M.")
Alligator Clips (for connecting the battery to the solar controller)
20Ft Extension Cable